And I'm back to the Character Viewer tutorial, sorry about the delay (unless you're reading this years later, in which case no time has passed thanks to the magic of the internet). We started by writing data we had hand-coded to a table, nice but useless. Last post we added a form to collect the character data from the user, also nice but useless. Now we're going to make this actually useful and take the data from the form and add it to our table. Well, as useful as it is to have a very limited character summery - hmm... we'll have to add some more to this project. Later. We've got enough work for today :)
Measure Twice and Cut Once
That's old carpenter's advise, but it applies to most everything. A good plan will keep things from going off the rails, and looking ahead lets you avoid problems instead of fixing them. So let's look at what we need to do before we start coding. I'm going to need a new function that takes the data from the form, formats it, and then calls the existing function to write it to the table. So I'm going to add that function and fill it with some comments about the things I need it to do...
Now, I might have missed some steps, we'll see as we go along, but this is enough of an outline to get me pointed in the right direction.
So let's set the foundation. First, I'm going to use the same function from the first post to iterate over the character object's properties and populate the table - so I need a blank object with the same properties...
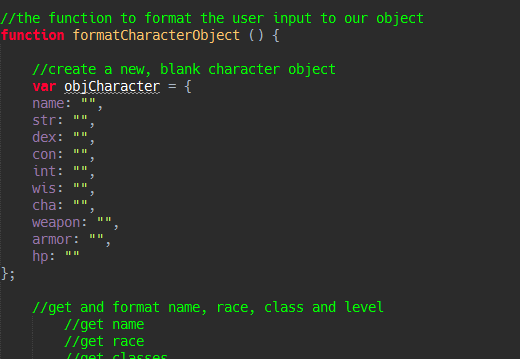
I'm going to pass that object to the function to write it, so let me add that too...
And at the moment I can't actually run the function because it isn't tied to anything. So let me add an onClick to the button I put on the form. I can do this in two ways. I can create an event listener in JavaScript or I can add it to the element in HTML. Under the Model-View-Controller paradigm I should keep it in JavaScript, where the "controller" stuff happens that makes the program run. But I actually like adding it to the HTML of the button itself, so when I look at the button I know what it's supposed to do. Neither is really wrong as far as the browser's concerned, it's a matter of style. Since the button is the only event handler I need, I'm going HTML. If I was using something like jQuery UI where I had to initialize a ton of elements I'd do it in JavaScript to keep things together. Anyways, here's the HTML attribute to fire the function when the button is clicked...
Okay, that sets up the framework, one blank object ready to be filled, a call to the function to display it, and a handler for the button to launch it. Now we just need to start getting some data.
Do You Want To Do This The Easy Way Or The Hard Way?
Let's start with the easy way. Some of our form data is going to need to be processed, so let's grab something that we can directly display - the HP total. The user is going to put in a number and we're going to directly copy that to the table, so it's a easy place to start. Or is it?
In order to get the data from the form we have to tell JavaScript where that data is. Which turns out to be more complicated that one might expect. There are actually a couple of ways to do this simple little thing. Let's go from most complicated to least (the latter being the one we want to actually use).
Like all things computer-related JavaScript has grown and developed over several versions. The last big version, or ECMAScript was ES5. In that version there are two main ways to select an HTML element, by Id or Class. There are two different functions for each. In this way to select an element we'd type:
document.getElementById("id")
or
document.getElementByClassName("class")
ES6, the latest version of JavaScript consolidated those into just one function:
document.querySelector("#id") or document.querySelector(".class")
The ES6 method isn't bad, but it also isn't great. It's kind of long, 26 characters without the selector. And we have about 14 form elements we need to look at. The easiest way is to create an alias, to define a function that's shorter to type and make it the same as the longer function. That's what something like jQuery does. In a simplified version (very, very simplified) jQuery does this:
function $ (selector) {
document.querySelector (selector);
};
which means you can type $("#id") instead of document.querySelector("#id"), which is 25 characters less typing. 25 characters may not seem like a lot, but when you make a few hundred selections that comes out to a short story's worth of saved code. And we could do the same thing jQuery does. But we won't. Honestly, if I'm going to do something jQuery-like then I might as well just use jQuery instead of reinventing the wheel (and a poor version at that). So for this tutorial I'm going to stick with the ES6 syntax and just copy-and-paste the code I need. 14 elements isn't a big deal, and if I decide to bulk up this app and add a bunch of features I'll just use jQuery and we'll have a tutorial about that :) So, now that we know how to select something let's do it.
Because our target is a textbox we need to select it, and then get it's "value" property. Then we're going to save that to a variable and write it to our object. Here's the code...
And here's what it looks like when we run it...
Woo Hoo!!! We just took user-input and wrote it to our form, high-fives! Okay, I'm way too happy about something so trivial :) Now that we got the easy part done, it's time to get more complicated.
Formatting The Attributes
This part is going to be ugly. The next hardest, in a very general sense, are the attributes. The attribute scores themselves are easy, we're going to take them from the form and input them directly to the table. It's the modifiers that are tricky. We decided (well, I decided and you got dragged along for the ride) to have the user only input the score and let JavaScript calculate the modifier. This is good because it prevents the player from messing up the modifier, people are human and and make mistakes, so things like this - just looking up data on a table - are good candidates for leaving to the computer. It was also a kind of dumb decision because it means adding more work for us with questionable reward. But this is a tutorial, so it gives us something to learn (and if I do develop this further it's likely something I'll change).
Our task then is three-fold, we need get the value and then use that to get the modifier, both of which get saved to the character object. Getting the value we've got, like with HP, we're going to look up the value and save it to a variable. To calculate the modifier we're going to write a new function that will apply the correct formula and return the modifier. Let's write that function now. So what is the formula for an attribute modifier in Pathfinder? It's the ability score minus 10, divided by 2 and rounded down. We save that and return that variable, which makes our helper function look like this...
Cool, we can calculate the modifier. Now comes the really tricky part. Our function to write the character object is really easy, it just iterates through the object and writes each property. Which means we have 6 properties for the attributes all of which are going to do the exact same thing, take a score, calculate the modifier, then make a string with both. So let's expand out helper function to do all of that, it'll cut down on the duplicate code. Or final function is going to look like this...
We have to call it 6 times, once for each attribute, because the way the form is set up we can't easily iterate through it. Okay, let me correct that. I know some ways to iterate through it, and how I could change it, but I don't know the best way. I'll look at changing this section after I've done some more research. For now, while this is not the ideal method, it isn't that terrible, so we'll go this way...
Which now looks like this when we create a character...
Woo Hoo again! That's a good chunk of our character done. Three more table cells to go.
Name, Social Security Number and Date of Birth, Please
Okay, let's get the name section done. There are 4 things we need: the name textbox, the race drop-down box, the classes (which are checkboxes and there can be more than one checked), and the character's level number box. Three of those things are easy :)
Let's grab the easy variables, with this code...
Which leaves the trickier part of checking the checkboxes. And I discovered something, when I wrote the HTML code for the checkboxes I didn't give them any Id's to be able to target them later. Ooops... so here's the fix to that...
And then I just need to query each checkbox and see if it's checked. If it is I'll add it to the string I'm going to display, which makes the function this...
With the final app looking like this...
En garde
That leaves just two more cells, the ones for the weapons and armor. Let's handle the weapons first. So we have three weapons, and they are on radio buttons so the player can only choose one. We need to get which one the player selects first. The weapon will give us the name and damage. Then we need to check the Base Attack Bonus field and add the appropriate attribute modifier to get the final part, the to-hit bonus. Those three strings get concatenated, or added together, to give us the table cell.
Or at least, that's how it should work.
There's just one little problem, our character object isn't formatted that way. When I first wrote this app I was looking for something simple, an easy way to write the data to the page. So each attribute is just a string, with both the score and the modifier together. And now that's a problem since I want to deal with those values separately. I could just take the score and calculate the modifier again, but the function I used to do that is the one that also returns the complete string. I did not structure these functions properly to fill in these last cells.
Now, I try with these tutorials to show things that work. I've written a few versions of the code so far and they didn't turn out right, so I omitted them. I want these to be learning experiences, not full of things you shouldn't do. I'm leaving this mistake in though because it does go back to the beginning of this post, that part where I was outlining what I needed to do. During that step I really should have looked closer at how to structure my data, what different pieces I was going to use. I didn't and now I'm in a bit of a fix. It's important to have a good plan, to be able to see what you're doing in your head. Even still you'll make mistakes, that's just how it works, but a good plan means fewer mistakes.
So how do I fix this?
I'll give you a minute, if this was your program what would you do?..........
.....
'K, time's up. I can see two options. The good one is to re-write the character object, so that I could use the modifiers in other ways down the road. That, however, would mean re-writing the function to put that data on the page. That's a lot of re-writing. So option two is easier, and what I'm going to do. I'm going to take the function I called to make the attributes and split it. I'll leave the part that makes the final string, I'm just moving the part that calculates the modifier into it's own function. That makes the least changes to the attributes code. Then, for the weapons and armor I can just call the function to make the modifier and use that. It'll basically double those calculations - but it's not like that'll matter in such a small program. It's not an elegant solution, but it's the least re-coding. Honestly this whole thing was a mistake from the beginning. My function to write the object directly to the table is simple, but it's also way, way too simple for something as complicated as a Pathfinder character. If this was a real app, meant to be useful and not a learning tool, I should have used a totally different design. But I didn't, so we'll go with what we've got and get this done.
That means that this is the revised code for the attributes function and the new modifier function:
Moving on from that glitch, now we need to get the selected weapon. And again there's another problem, just like with the checkboxes I didn't give each button an Id to reference it by. Ohmygosh, and the armor radio buttons are the same way of course. So let me fix all that...
Just like with the checkboxes we're basically going to do a bunch of if/then statements on each button. There is a better way to iterate through the form, again though this is a small and limited app so I'm not going to worry about that right now. This gets kind of complicated, so let me break it down step by step.
First, I'm going to use the parseInt() function and get the Base Attack Bonus. Even though this is listed as a number field in HTML I want to make sure JavaScript treats it as a number.
I'm then going to check with some if/then blocks what radio button is checked.
Another parseInt() on the function to find the correct attribute modifier gives us the other half of the to-hit modifier, and the damage modifier (except for the bow, which doesn't add any attribute for damage, only to-hit).
Then we check if the To-hit modifier is 0 or higher, if it is I'm adding a "+" in front of the number; if it's negative there is no "+" of course.
Lastly the same 0 or higher check for the damage modifier, for formatting purposes, and then the string is assigned to the character object.
It's a lot of code for something so simple, here's the unarmed code block (for brevity's sake):
I missed the screenshot of the table, oh well, we're almost done so you can see the final version soon :)
Hide Behind The Pile Of Dead Bards!
Ohmygoodness... we're almost done. Yeah, this is a way too complicated "tutorial" for a fairly simple concept. I know I haven't been the greatest teacher so far, and I'm sorry about that. I'm learning myself. But this is it, one last section and we'll be done.
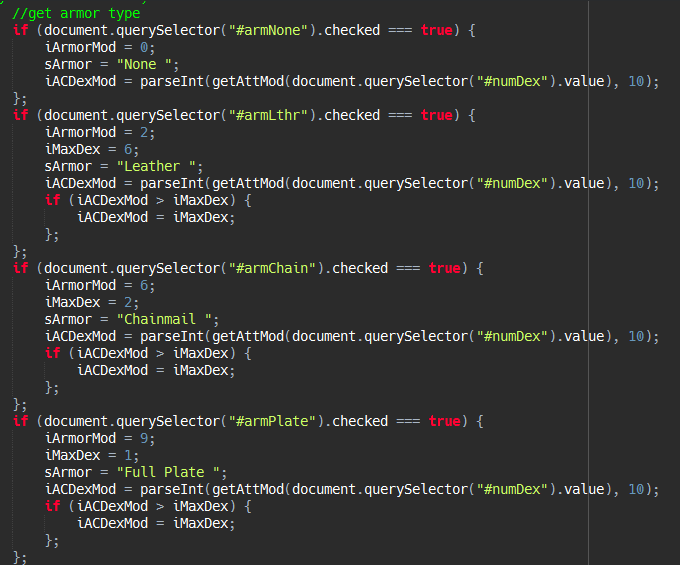
So armor is a lot like weapons. First we need to figure out which one is selected. Then, instead of getting a BAB score, each type of armor is going to have its own armor class modifier. Then we just add different modifiers to the base armor class to get the "touch" and "flat-footed" armor classes. So, like weapons this is going to take a fair amount of code to work out.
Let's examine the individual components before we start madly coding. There are three things that make a character's AC. First there is the base AC that everybody gets, a 10. This is the universal "naked man" AC. Then there is the armor's modifier. This is easy, each type has it's own mod (with "none" or no armor being a 0) - but, the catch is that you add your armor mod to your "full" or default AC and to your flat-footed AC, but not to your touch AC. Last is the character's Dex modifier, again easy, but while you add it to the full AC and touch AC, it is capped depending on the type of armor, and it isn't added to the flat-footed AC.
So first I'm going to determine what type of armor the character is wearing. That will let me get the Armor AC modifier, the name of the armor for the final string, and then I can get the Dex mod and do an if/then block to make sure it isn't above the max dex for that type of armor. Here's the code:
Then I can finish by adding the right things together, forming them into the string and writing the final string to the character object. Here's that code:
And here are what a few finished characters look like:
Great goodness, that took a very long time. Well, for me at least - you're lucky you can just read the end results. So at last we have looked at how to get data from a form and write it to an HTML table. Is this app very useful? Well, I guess it might be in a limited way. If you changed everything to textboxes you could easily let people write their own stuff, and that would cut out a lot of the programming headaches, and it might actually be a somewhat useful app. I will leave that to the reader if you want to try it :) Here is the link to my Google Drive with the code.
This little project spiraled out of control into something of a trainwreck, but hopefully it was a learning experience - it was for me :) Who knows, maybe it would be worth it to play with this some more and turn it into some kind of character creation utility... hmmm.... we'll see. For now I am going to sign off and go get that breakfast I'm 8 hours overdue for. Until next time!
Showing posts with label JavaScript. Show all posts
Thursday, January 4, 2018
Thursday, November 2, 2017
Simple Character Viewer Tutorial: writing HTML tables with JavaScript
I've found a lot of great sources of information about programming since I started teaching myself a few months ago. My first idea for the "Thursday Tutorials" section of this blog was to put links to some of that information so it can help others. But I did have another dream, which I want to realize today: writing my own tutorials. Now I need to stress again that I am not an expert coder, as mentioned I only started learning this stuff a few months ago - but I have discovered over the years that the best way for me to learn something is to try and teach it to others. So this is going to be the first post in a series aimed at learning how to do something in HTML/ CSS/ JavaScript. I have been discussing my code in the Friday Frustrations series (currently working on my project called "Bookworm"), but that series is meant to produce a working application. This series is meant to look at one specific topic and discuss how to do it; what I'm going to make is not anything really useful (at least not to start, who knows what'll happen as we add features to it?). Which begs the question: what are we going to make?
One handy thing to be able to do is to write data to a table. So here's a screenshot of an HTML table that has some basic character information:
Instead of hand-coding that table, wouldn't it be nice if we could make a blank table and then write each row dynamically using JavaScript? It sure would! So how do we do that? Well, Grasshopper, let me show you...
Creating The Base Table
First of all we need the basic table layout, with the header and stuff. I'm going to add some CSS to make things look pretty. This is the final blank table...
And here's the HTML code...
And the CSS code...
That gets us the basic table, now we just need to be able to populate it.
Creating the Character Object
So we have 10 table cells that we need to display on each row. I'm going to start by doing this the easy way. The easiest way is to make each cell a string. So for an attribute, like the "16 (+3)" in the example I'm just going to store that same string in my JavaScript object. Now, I'm doing that because I want to show you how to write data to a table, and that's the simplest way to do it. But, in reality that would not be a very useful object to actually write code for in something more interactive. The main attribute value, "16," and the modifier, "(+3)," should be stored as separate bits of data so they could be read/ interacted with individually. And we'll see about writing something that will be more useful to program and read down the road. For now let's start easy.
That dealt with, basically we just need an object that has 10 values, the string for each cell. That's a pretty easy object to create...
I'm going to hand-code a few of these to start with, then we'll look at how to let the user create their own...
Writing the object to the table
Objects in hand, and basic table set up, let's get to the main event and actually write those objects to the table. I'm going to start by doing this in pure JavaScript (I'll add how to do this with jQuery in a bit). What we're going to do is create a new table row, add each cell from the character object, and then append that to the table.
Let's look at the ugly way to do this.
What we need to do is comprised of several parts. First, we need to create a "document fragment" - some HTML code that isn't attached to anything. Our fragment starts with a <tr> to make a new row, then we make a new <td> cell and fill it with the right object property. We need to add the object's string with a method called "innerHTML" - that's because we're adding <br> HTML tags to the strings for formatting, if we add them as plain text the browser will just display "<br>" instead of actually making a new line. Let me show you what I mean...
So, with that in mind, let's look at that ugly code. Basically, the ugly way is the longest way possible - in this case that's hand-coding each cell. Here's a screenshot of the code...
And what it looks like...

As you can see this does work, it adds the data and formats it properly, but it's ugly because we have to write a lot of repetative code for each step. Instead of writing out each object property by hand, why don't we see if we can use a loop to simplify the process? Remember, a good programmer is a lazy programmer :) That said, we can look at our ugly code and see exactly what steps we need to repeat:
//write the object to a document fragment
var tblRow = document.createElement('tr');
//create and append each property
var tblName = document.createElement('td');
tblName.innerHTML = CharacterObj.name;
tblRow.appendChild(tblName);
var tblStr = document.createElement('td');
tblStr.innerHTML = CharacterObj.str;
tblRow.appendChild(tblStr);
var tblDex = document.createElement('td');
tblDex.innerHTML = CharacterObj.dex;
tblRow.appendChild(tblDex);
//append the fragment to the table
var domTarget = document.getElementById('tblCharDisplay');
domTarget.appendChild (tblRow);
The beginning we only need to do once, creating the <tr> for the new row our character will take up. I'm only going to use one row for each character, though I don't have to. The name cell has 3 lines, and so do the weapon and armor cells - so I could have each character split across 3 rows. I just don't think that would be very useful, it would mean even more code to make the extra rows and several of those cells would be empty - I think using the <br> tags is a more convenient way to get the formatting I want.
Also the ending, appending the fragment to the main table, is something we only need to do once.
The repeating code that we need a loop to handle is in the middle, creating the individual <td> cells for each of the 10 object properties. That code is make up of 3 parts, first we create the new <td> cell, which is empty. Then we fill the cell using innerHTML with the object's property string. Last we append the cell to the row. Easy. So let's look at the loop that's going to handle this for us...
//create and append each property
let prop;
for (prop in CharacterObj) {
var tblCell = document.createElement('td');
tblCell.innerHTML = CharacterObj[prop];
tblRow.appendChild(tblCell);
};
This is pretty simple. We made a variable to hold the current property. Then we use a for-loop to iterate over each property in the object, creating a cell, populating it and adding it to the row. It looks like this...
And there you go, we've written some data from a JavaScript object to an HTML table. Good job us! Yeah, yeah, I know it's not really that big of a deal, but you have to acknowledge every accomplishment, even the little ones.
Since this isn't a very impressive app, there is a lot of room for improvement. Which we'll do next week :) If you want to play with the code for this yourself, here's a link to it on my Google Drive.
Thursday, September 14, 2017
The Open2 Engine - part 6 - Twine-like Text
Now I'm going to pull together some of the things I've been talking about in my whirlwind series. And, if I can get it to work, I'm going to do so in this very post.
So my first sample project is going to show and hide text like Twine does. There's a thing called Lorem ipsum, it's placeholder text, and I found some cool alternate ones on-line that I'm going to use to fill in my example passages below.
Lorem ipsum dolor sit amet, consectetur adipiscing elit. Duis tincidunt dapibus posuere. Nam dapibus, ante eget fermentum accumsan, ex orci facilisis purus, dignissim pretium nisi quam at erat. In faucibus purus sit amet sodales lobortis. Ut ullamcorper mollis dolor, non dictum justo venenatis ac. Nulla eu rhoncus neque, vel finibus urna. Integer vitae est tortor. Vivamus pellentesque vel diam volutpat mattis. Quisque aliquet turpis vel lectus blandit, ut elementum risus laoreet. Aliquam erat volutpat. Nulla facilisi. Praesent gravida tellus in ligula hendrerit feugiat. Fusce sodales porta nisi, eget vulputate enim. Aenean at rutrum tellus. Phasellus tincidunt lacus a augue suscipit, et pharetra eros suscipit. Integer nulla enim, porttitor in luctus sed, vestibulum quis lorem.
Next Passage
Next Passage
You're all clear, kid. Let's blow this thing and go home!Ye-ha! I can't get involved! I've got work to do! It's not that I like the Empire, I hate it, but there's nothing I can do about it right now. It's such a long way from here. The Force is strong with this one. I have you now.Don't be too proud of this technological terror you've constructed. The ability to destroy a planet is insignificant next to the power of the Force. Hey, Luke! May the Force be with you. Look, I can take you as far as Anchorhead. You can get a transport there to Mos Eisley or wherever you're going. I want to come with you to Alderaan. There's nothing for me here now. I want to learn the ways of the Force and be a Jedi, like my father before me.Leave that to me. Send a distress signal, and inform the Senate that all on board were killed. Escape is not his plan. I must face him, alone. I care. So, what do you think of her, Han? I care. So, what do you think of her, Han? Dantooine. They're on Dantooine. I find your lack of faith disturbing.
Next Passage
Next Passage
Knights of Ni, we are but simple travelers who seek the enchanter who lives beyond these woods. I don't want to talk to you no more, you empty-headed animal food trough water! I fart in your general direction! Your mother was a hamster and your father smelt of elderberries! Now leave before I am forced to taunt you a second time! Shut up! Will you shut up?! Oh, ow! Well, how'd you become king, then? Camelot! Shut up! But you are dressed as one… Burn her anyway! I dunno. Must be a king. And the hat. She's a witch! A newt? Found them? In Mercia?! The coconut's tropical! You don't vote for kings. I have to push the pram a lot.
Next Passage
Next Passage
Smooth as an android's bottom, eh, Data? Mr. Crusher, ready a collision course with the Borg ship. You did exactly what you had to do. You considered all your options, you tried every alternative and then you made the hard choice. Our neural pathways have become accustomed to your sensory input patterns. You're going to be an interesting companion, Mr. Data. They were just sucked into space. A lot of things can change in twelve years, Admiral. That might've been one of the shortest assignments in the history of Starfleet. Wait a minute - you've been declared dead. You can't give orders around here. I think you've let your personal feelings cloud your judgement. Captain, why are we out here chasing comets? Some days you get the bear, and some days the bear gets you. Is it my imagination, or have tempers become a little frayed on the ship lately? Maybe we better talk out here; the observation lounge has turned into a swamp. Well, that's certainly good to know. When has justice ever been as simple as a rule book? Talk about going nowhere fast. Fate. It protects fools, little children, and ships named "Enterprise." I'll be sure to note that in my log. Yesterday I did not know how to eat gagh. I'll alert the crew. Why don't we just give everybody a promotion and call it a night - 'Commander'? Travel time to the nearest starbase? Computer, lights up! Mr. Worf, you sound like a man who's asking his friend if he can start dating his sister.
Next Passage
Next Passage
Th’art nesh thee nay lad soft lad wacken thi sen up t’foot o’ our stairs. Nay lad where’s tha bin. Th’art nesh thee a pint ‘o mild any rooad t’foot o’ our stairs. Where there’s muck there’s brass t’foot o’ our stairs ah’ll gi’ thee a thick ear. Ah’ll learn thi tintintin tell thi summat for nowt soft lad mardy bum. Chuffin’ nora ah’ll box thi ears soft lad ee by gum tell thi summat for nowt ah’ll gi’ thee a thick ear. Bobbar nay lad. Breadcake soft southern pansy wacken thi sen up. Be reet where’s tha bin mardy bum mardy bum. Tell thi summat for nowt where there’s muck there’s brass shu’ thi gob. Dahn t’coil oil. That’s champion ey up will ‘e ‘eckerslike shurrup by ‘eck. Eeh. Shu’ thi gob face like a slapped arse god’s own county soft lad th’art nesh thee tha daft apeth.
The End
Let's look at the code that makes this work...
First, we need to set up the page. In this case I'm using a bunch of HTML <div> tags to separate each passage. I need to be able to pick out each one to show or hide, so I'm giving each an ID attribute. They are all going to have some light blue text, for this example, so I'm giving them a class of "example" - and they are all going to start hidden, except for the first one, so I'm giving them another class of "passage" - which looks like this...
<div class="example" id="1"></div>
<div class="example passage" id="2"></div>
<div class="example passage" id="3"></div>
The CSS to make the text color and hide the passages looks like this...
.example {color: LightSteelBlue;}
.passage {display: none;}
Now I need the links, the way to change the passages. I'm using a plain anchor link, with a target of "#" as a placeholder, and I'm adding a special attribute. HTML 5 let's you make up your own attributes starting with "data-". I'm going to add a "data-goto" attribute to each link, and the attribute's value is going to be the ID of the passage to show. Adding some placeholder text and the links makes my HTML look like this:
<div class="example" id="1">
Sample Text
<a href="#" data-goto="2">Next Passage</a>
</div>
<div class="example passage" id="2">
Sample Text
<a href="#" data-goto="2">Next Passage</a> </div>
<div class="example passage" id="3">
Sample Text
<a href="#" data-goto="2">Next Passage</a> </div>
Now, I need to use some JavaScript to make the links show and hide the passages.
I'm going to use jQuery to get the anchor links. Thing is, what if I didn't know how many links there were going to be? And what if I wanted some regular links and some links that changed passages? What if I wanted to use buttons or images along with anchor links? Well, then I should set my code to look for anything that had the "data-goto" attribute, whatever element that is, and ignoring all others...
$('[data-goto]')
Okay, that will add this to just the elements I want. Now, I need to set a "click handler" - a function to run when the user clicks on the link/whatever...
.on('click', function (event) {
Now for the function itself. I want to do two things, hide the current passage and show the next one. Hiding the current passage is easy, I'm going to get the parent <div> of the link (that's the <div></div> that's around the link), I'll get that in two steps. First I need to select the link that's been clicked on. The event handler passed along the event itself as a parameter, that set something called "this". "This" is a context, a reference to the calling object (it's really complicated, which is why I didn't mention it before - just roll with it). By selecting "this" I can then use the jQuery method of .parent() to get a parent of the link, in this case the <div>. Lastly I can use another method .hide() to hide that div. Yeah, it's complicated to describe it, but it's actually pretty simple - and it's just one line of code...
$(this).parent('div').hide();
With the current passage hidden, I just need to show the next one. I'm going to have to select the next passage, which I'm doing by using the same number in the "data-goto" attribute of the link and the "id" attribute of the passage. To select an ID with jQuery you add a hash, "#", so I'm going to make a string with the hash and number. Then, I'll make the selection with that string and use the method .show() to show the new passage...
let sGoto = "#" + $(this).attr('data-goto');
$(sGoto).show();
Finally, I'm using return false to stop the default behavior of the anchor link. I didn't do this in a separate page I created, but when I copied the code onto Blogger I had the links do weird things, so this just tells Blogger to ignore my special links...
return false;
});
And there you go, you now have a way to show and hide passages just like Twine!
I did want to add another little project, a tiny Parser game, but my code is not liking me today - so that'll be an upcoming update :)
Wednesday, September 13, 2017
The Open2 Engine - part 5 - Whirlwind JavaScript
Okay, with HMTL we made a document, CSS made that document pretty, now with JavaScript we can make that document act and react. So let's do another Flash-fast tour, hold on to your hats...
Variables
Okay, let's start with variables - how we store data. If our program is going to do something, odds are it's going to need to remember information. A variable is just that, a place to put some data. Creating a variable is usually with "var" like this...
var variableName = "data";
Now, the "variableName" is an example of "Camel Case" which is the JavaScript convention of naming everything with a lower-case word, and adding capitalized words after to create a descriptive name. You could name a variable anything beginning with '$', '_', or a letter - after which you can use the same and numbers (so can't start with a number, can use it later though).
Variables come in different types, and the one I made above is a "string" - a series of numbers/letters/symbols, like a sentence. Since a string is created by using quotes, if you want quotes in the string itself you've got to mix them...
var htmlElement = 'myElement attribute="value" something';
or you have to "escape" them with the backslash...
var htmlElement = "myElement attribute=\"value\" something";
Notice that I've put a semicolon at the end of each line, the semicolon is used to tell JavaScript where the end of a command is at (like how a period shows the end of a sentence).
Instead of making a string, I could make a number, like so...
var myNumber = 10;
However, JavaScript is a "loosely typed" language, which means a variable can be just about anything. That will occasionally make life interesting when a variable is not what you think it is.
Here's an example, let's add two numbers together...
var A = 1;
var B = 1;
var C = A + B;
console.log(C);
>2
Okay, the "console" is a hidden developer tool (you can access it from a browser or your programming IDE, you can't see it with just a text editor). I'll use the ">" at the start if a line to show what the console would output (if you were running this and not reading it :). So in our example above we get just what we expect, we set two variables, each is equal to the number 1, and we add them together to get the number 2.
But what if we accidentally put some quotes around one of our variables? Like this...
var A = "1";
var B = 1;
var C = A + B;
console.log(C);
>11
Huh? Well, by putting the quotes around the first variable we turned it into a string instead of a number, and addition on a string becomes "concatenation" (or, combining the contents of two strings into one)...
var A = "this";
var B = "WORD";
var C = A + B;
console.log(C);
>thisWORD
Because JavaScript doesn't track variables too closely, I like to do it myself (this number/string thing has bit me on the rump before) so I can remember what something is. Camel Case is not very descriptive to me, I prefer something called "Hungarian Notation" where you prefix every variable name with the type of data that variable is supposed to hold.
So, the way I would write a string is to start with the letter "s" (for string)...
var sFirstName = "Bob";
var sAddress = "123 Lane";
Most numbers I've had to track were whole numbers, or integers, so they start with "i"...
var iLocationsDiscovered = 0;
var iHitPoints = 20;
There's not really a right or wrong way, it depends on your audience. If you're programming as a part of a team, you should use whatever naming convention the team uses (duh). Since I'm writing this by myself (and I'm old and crotchety) I'm going to use my own style of naming (which you should know since you're going to have to read it :).
In my projects so far, pretty much the first thing I've done is start declaring the variables I'm going to need. But, while strings and numbers are nice, they are pretty much just one piece of information per variable, what if we wanted to store several bits of data in one place?
Arrays
Think of a backpack. It's a single object, but it can contain multiple items within itself. That's basically an Array. We define an array with brackets, and separate the items within by commas...
var aBackpack = [rock, knife, apple];
So how do we find something in the array? By using it's "index", which is a number - starting with zero! - that points to the array's contents...
console.log(aBackpack[0]);
>rock
console.log(aBackpack[1]);
>knife
console.log(aBackpack[2]);
>apple
We can also make an empty array and then define the contents like variables...
var aBackpack = [];
var aBackpack[0] = "rock";
var aBackpack[1] = "knife";
var aBackpack[2] = "apple";
Arrays also have "methods", special commands we can call to interact with the array. One is "push" which adds an item to the end of the array. "Pop" will delete the last item, and "length" will say how many items are in the array...
var aBackpack = [rock, knife, apple];
console.log(aBackpack.length);
>3
aBackpack.push(potion);
console.log(aBackpack);
console.log(aBackpack.length);
>rock, knife, apple, potion
>4
aBackpack.pop;
console.log(aBackpack);
>rock, knife, apple
Arrays can hold any kind of data, strings, numbers, even other arrays! Arrays can also hold objects...
Objects
Like an array, an Object is a way to group several variables together. Objects are made with curly braces "{ }" and hold key: value pairs...
oPlayer= {
Name: "Bob",
Class: "Fighter",
Strength: 10,
hitPoints: 20,
Backpack: [rock, knife, apple]
};
These are all "properties" and can be accessed with "dot notation" or the objectName.propertyName...
console.log(oPlayer.Name);
>Bob
console.log(oPlayer.Backpack[1]);
>knife
We can also give objects "methods" or commands that they can carry out, and we can add a property or method by defining the object with it...
oPlayer.Punch = function () {
console.log("pow!")
};
oPlayer.Punch();
>pow!
Objects are a great way to keep information together, but let's look at how to actually act on that information with functions...
Functions
Data just sits there, to act on it we need functions. Declaring a new function looks like...
function functionName (parameters) { commands };
Let's make a hypothetical "Attack Turn" function, we'll have a monster attack a character (which will be a nice complex example). Virtually every function is going to act on some variables, so let's think about the ones we need. We're going to need a monster and a player, so we'll make them 2 objects. Each is going to need a chance to hit, which we'll turn around and say is a % chance "to be hit" (you'll see). Each is also going to need the damage they do, and the health they have. That should do for a bare-minimum example. So here are my two objects...
oPlayer = {
ToBeHit: 40;
Health: 20;
Damage: 5;
};
oMonster = {
ToBeHit: 60;
Health: 10;
Damage: 10;
};
I'm giving my player lower odds of being hit, but the monster does more damage (just because, it's an example :).
Now, the first things we need to create our function is a name and the parameters. "Parameters" are just variables we're going to pass to the function for it to work on. In this case, I'm going to pass two parameters, the attacker and the defender. So I've got this...
function fAttackTurn (attacker, defender) { };
Okay, now we need the code, the commands of what the function should do. There are some functions that JavaScript has created for us, one of them is "Math.random" which we can use to get a random number. So we're going to get the chance to hit needed, then a random number between 1 and 100, compare the two, and if the random number is lower than or equal to the chance to hit, we'll do the attacker's damage to the defender's health. This should show us a lot of what functions can do.
First, inside the function let's make a variable for the attack roll (our random number)...
function fAttackTurn (attacker, defender) {
var iAttackRoll;
};
Well, that makes an "undefined" variable, one that has no value (not even zero). Let's make it equal to the JavaScript function for our 1-100 number (which is, well, complicated)...
function fAttackTurn (attacker, defender) {
var iAttackRoll = Math.floor(Math.random () * 100) + 1;
};
Yeah, it's a bit complicated, functions can get that way. Anyways, that will give us a random number between 1 and 100. So let's compare that number to the defender's odds of being hit and see if it's less than or equal to (a hit) or greater than (a miss)...
function fAttackTurn (attacker, defender) {
var iAttackRoll = Math.floor(Math.random () * 100) + 1;
if ( iAttackRoll <= defender.ToBeHit){
} else {
}
};
Well, what do we want to do? Either way let's do the console.log of what we got, and if we do hit then we want to subtract the attacker's damage from the defender's health...
function fAttackTurn (attacker, defender) {
var iAttackRoll = Math.floor(Math.random () * 100) + 1;
if ( iAttackRoll <= defender.ToBeHit){
console.log("You hit!")
defender.Health = defender.Health - attacker.Damage
} else {
console.log("You missed!")
}
};
Okay, let's stop and look at how we'd "call" this function, or run it. We'll have the monster attack the character...
fAttackTurn (oMonster, oPlayer)
To have the player attack the monster, we reverse the parameters...
fAttackTurn (oPlayer, oMonster)
Okay, so let's stop and look at some of that function in more detail.
Decisions and Loops
One of the things our "Attack Turn" function had to do was make a decision - it had to decide if the attack roll was higher than the defender's defense. To do that we used an "if" statement
if ( iAttackRoll <= defender.ToBeHit)
If has a lot of ways to compare things (and thus, it's a pretty common way to make decisions)...
if ( this > that ) - greater than
if ( this >= that ) - greater than or equal
if ( this < that ) - less than
if ( this <= that ) - less than or equal
To compare if two things are equal is a little tricky, one way is like this...
if ( this == that)
One equal sign "sets" a variable to a value, 2 equal signs "compares" two variables/values. The catch is that 'number as a string' problem at the beginning of the post. Let's make 2 numbers and compare them...
var A = 1
var B = 1
if ( A == B ) {
console.log ("true!")
}
>true!
Now, let's make one of those a string instead of a number...
var A = "1"
var B = 1
if ( A == B ) {
console.log ("true!")
}
>true!
Well, that's still true even though one variable is a string and the other is a number. We might not want that, we might want to only compare numbers to numbers or strings to strings. That takes three equal signs, and while the code in the "if" will run if that's true, let's add the "else" to run code if it's false...
var A = "1"
var B = 1
if ( A = = = B ) {
console.log ("true!")
} else {
console.log("false!")
}
>false!
I spaced out the equals signs to show there are 3 of them, called "strict equality".
"If" is the most common way to make a decision, but sometimes we need to "loop" or go through a series of values and check each one. Let's say we want to look in the player's backpack and see if they have a knife. The most common loop is "for"...
for ( counter ; comparison ; operation ) {
do something
}
So, first we create a counter, which is a variable almost always called "i", and we set a starting value...
for ( i = 0 ; comparison ; operation ) {
do something
}
Next we compare where we are (with our counter) to where we want to be (or the end of the loop, which in this case is the length of the player's backpack)...
for ( i = 0 ; i < backpack.length ; operation ) {
do something
}
Why not go until i <= backpack.length? Because the loop is always going to run the first time, so we want to stop before the length or else we'd run one time too many.
Lastly, we need to increase our counter (otherwise we won't go forward) which is usually with the "increment" operator, which takes a variable and adds 1 to it...
for ( i = 0 ; i < backpack.length ; i++ ) {
do something
}
And then we'd add the code to see if the backpack item we were looking at was the one we wanted. Which I'll leave as an exercise for the reader :).
Manipulating The DOM
Okay, I need to wrap this up because I've been typing for a few hours now!
So far we've just looked at JavaScript itself, how do we get our JavaScript to interact with the webpage? Well, we use the DOM, or Document Object Model. Basically, JavaScript itself gives us a few functions to access parts of the page.
There are 3 main functions we can use to select something on the page. If we want to get a tag (like <p> or <div>) we'd use...
document.getElementsByTagName("p")
document.getElementsByTagName("div")
If we want to get an element by it's class (let's say the class is "yellowtext"), we'd use...
document.getElementsByClassName("yellowtext")
And to get an element by it's ID..
document.getElementById("id")
We can also change the content of an element with...
element.innerHTML = new html content
I'm actually not going to go into this in any detail, while you can access elements from JavaScript I really prefer to use a JavaScript library called jQuery which is a lot easier to use (and type) - I'll go into jQuery when I start using it on the project.
Events
Last thing to mention, and again it's time to wrap this up - we can also listen for "events" something that the user does. So we can listen for a "click" event and do something when the user clicks on a button, or a "mouseover" event for when the user moves the mouse over an element. Again this is something that can be done in JavaScript, but I'm going to use jQuery for - and I'll be able to give you some concrete examples once the project gets rolling.
Wow, that was a lot - and even though I always say I've only scratched the surface, in this case that's an understatement! There is so very much more of JavaScript to cover - which is why it's usually discussed in something the size of a book!
This finishes the last of my 'whirlwind' tours, next post we're going to actually make something using HTML, CSS and JavaScript. As I've mentioned before, my recommended starting point to learn more is the w3schools site.
Until tomorrow!
Variables
Okay, let's start with variables - how we store data. If our program is going to do something, odds are it's going to need to remember information. A variable is just that, a place to put some data. Creating a variable is usually with "var" like this...
var variableName = "data";
Now, the "variableName" is an example of "Camel Case" which is the JavaScript convention of naming everything with a lower-case word, and adding capitalized words after to create a descriptive name. You could name a variable anything beginning with '$', '_', or a letter - after which you can use the same and numbers (so can't start with a number, can use it later though).
Variables come in different types, and the one I made above is a "string" - a series of numbers/letters/symbols, like a sentence. Since a string is created by using quotes, if you want quotes in the string itself you've got to mix them...
var htmlElement = 'myElement attribute="value" something';
or you have to "escape" them with the backslash...
var htmlElement = "myElement attribute=\"value\" something";
Notice that I've put a semicolon at the end of each line, the semicolon is used to tell JavaScript where the end of a command is at (like how a period shows the end of a sentence).
Instead of making a string, I could make a number, like so...
var myNumber = 10;
However, JavaScript is a "loosely typed" language, which means a variable can be just about anything. That will occasionally make life interesting when a variable is not what you think it is.
Here's an example, let's add two numbers together...
var A = 1;
var B = 1;
var C = A + B;
console.log(C);
>2
Okay, the "console" is a hidden developer tool (you can access it from a browser or your programming IDE, you can't see it with just a text editor). I'll use the ">" at the start if a line to show what the console would output (if you were running this and not reading it :). So in our example above we get just what we expect, we set two variables, each is equal to the number 1, and we add them together to get the number 2.
But what if we accidentally put some quotes around one of our variables? Like this...
var A = "1";
var B = 1;
var C = A + B;
console.log(C);
>11
Huh? Well, by putting the quotes around the first variable we turned it into a string instead of a number, and addition on a string becomes "concatenation" (or, combining the contents of two strings into one)...
var A = "this";
var B = "WORD";
var C = A + B;
console.log(C);
>thisWORD
Because JavaScript doesn't track variables too closely, I like to do it myself (this number/string thing has bit me on the rump before) so I can remember what something is. Camel Case is not very descriptive to me, I prefer something called "Hungarian Notation" where you prefix every variable name with the type of data that variable is supposed to hold.
So, the way I would write a string is to start with the letter "s" (for string)...
var sFirstName = "Bob";
var sAddress = "123 Lane";
Most numbers I've had to track were whole numbers, or integers, so they start with "i"...
var iLocationsDiscovered = 0;
var iHitPoints = 20;
There's not really a right or wrong way, it depends on your audience. If you're programming as a part of a team, you should use whatever naming convention the team uses (duh). Since I'm writing this by myself (and I'm old and crotchety) I'm going to use my own style of naming (which you should know since you're going to have to read it :).
In my projects so far, pretty much the first thing I've done is start declaring the variables I'm going to need. But, while strings and numbers are nice, they are pretty much just one piece of information per variable, what if we wanted to store several bits of data in one place?
Arrays
Think of a backpack. It's a single object, but it can contain multiple items within itself. That's basically an Array. We define an array with brackets, and separate the items within by commas...
var aBackpack = [rock, knife, apple];
So how do we find something in the array? By using it's "index", which is a number - starting with zero! - that points to the array's contents...
console.log(aBackpack[0]);
>rock
console.log(aBackpack[1]);
>knife
console.log(aBackpack[2]);
>apple
We can also make an empty array and then define the contents like variables...
var aBackpack = [];
var aBackpack[0] = "rock";
var aBackpack[1] = "knife";
var aBackpack[2] = "apple";
Arrays also have "methods", special commands we can call to interact with the array. One is "push" which adds an item to the end of the array. "Pop" will delete the last item, and "length" will say how many items are in the array...
var aBackpack = [rock, knife, apple];
console.log(aBackpack.length);
>3
aBackpack.push(potion);
console.log(aBackpack);
console.log(aBackpack.length);
>rock, knife, apple, potion
>4
aBackpack.pop;
console.log(aBackpack);
>rock, knife, apple
Arrays can hold any kind of data, strings, numbers, even other arrays! Arrays can also hold objects...
Objects
Like an array, an Object is a way to group several variables together. Objects are made with curly braces "{ }" and hold key: value pairs...
oPlayer= {
Name: "Bob",
Class: "Fighter",
Strength: 10,
hitPoints: 20,
Backpack: [rock, knife, apple]
};
These are all "properties" and can be accessed with "dot notation" or the objectName.propertyName...
console.log(oPlayer.Name);
>Bob
console.log(oPlayer.Backpack[1]);
>knife
We can also give objects "methods" or commands that they can carry out, and we can add a property or method by defining the object with it...
oPlayer.Punch = function () {
console.log("pow!")
};
oPlayer.Punch();
>pow!
Objects are a great way to keep information together, but let's look at how to actually act on that information with functions...
Functions
Data just sits there, to act on it we need functions. Declaring a new function looks like...
function functionName (parameters) { commands };
Let's make a hypothetical "Attack Turn" function, we'll have a monster attack a character (which will be a nice complex example). Virtually every function is going to act on some variables, so let's think about the ones we need. We're going to need a monster and a player, so we'll make them 2 objects. Each is going to need a chance to hit, which we'll turn around and say is a % chance "to be hit" (you'll see). Each is also going to need the damage they do, and the health they have. That should do for a bare-minimum example. So here are my two objects...
oPlayer = {
ToBeHit: 40;
Health: 20;
Damage: 5;
};
oMonster = {
ToBeHit: 60;
Health: 10;
Damage: 10;
};
I'm giving my player lower odds of being hit, but the monster does more damage (just because, it's an example :).
Now, the first things we need to create our function is a name and the parameters. "Parameters" are just variables we're going to pass to the function for it to work on. In this case, I'm going to pass two parameters, the attacker and the defender. So I've got this...
function fAttackTurn (attacker, defender) { };
Okay, now we need the code, the commands of what the function should do. There are some functions that JavaScript has created for us, one of them is "Math.random" which we can use to get a random number. So we're going to get the chance to hit needed, then a random number between 1 and 100, compare the two, and if the random number is lower than or equal to the chance to hit, we'll do the attacker's damage to the defender's health. This should show us a lot of what functions can do.
First, inside the function let's make a variable for the attack roll (our random number)...
function fAttackTurn (attacker, defender) {
var iAttackRoll;
};
Well, that makes an "undefined" variable, one that has no value (not even zero). Let's make it equal to the JavaScript function for our 1-100 number (which is, well, complicated)...
function fAttackTurn (attacker, defender) {
var iAttackRoll = Math.floor(Math.random () * 100) + 1;
};
Yeah, it's a bit complicated, functions can get that way. Anyways, that will give us a random number between 1 and 100. So let's compare that number to the defender's odds of being hit and see if it's less than or equal to (a hit) or greater than (a miss)...
function fAttackTurn (attacker, defender) {
var iAttackRoll = Math.floor(Math.random () * 100) + 1;
if ( iAttackRoll <= defender.ToBeHit){
} else {
}
};
Well, what do we want to do? Either way let's do the console.log of what we got, and if we do hit then we want to subtract the attacker's damage from the defender's health...
function fAttackTurn (attacker, defender) {
var iAttackRoll = Math.floor(Math.random () * 100) + 1;
if ( iAttackRoll <= defender.ToBeHit){
console.log("You hit!")
defender.Health = defender.Health - attacker.Damage
} else {
console.log("You missed!")
}
};
Okay, let's stop and look at how we'd "call" this function, or run it. We'll have the monster attack the character...
fAttackTurn (oMonster, oPlayer)
To have the player attack the monster, we reverse the parameters...
fAttackTurn (oPlayer, oMonster)
Okay, so let's stop and look at some of that function in more detail.
Decisions and Loops
One of the things our "Attack Turn" function had to do was make a decision - it had to decide if the attack roll was higher than the defender's defense. To do that we used an "if" statement
if ( iAttackRoll <= defender.ToBeHit)
If has a lot of ways to compare things (and thus, it's a pretty common way to make decisions)...
if ( this > that ) - greater than
if ( this >= that ) - greater than or equal
if ( this < that ) - less than
if ( this <= that ) - less than or equal
To compare if two things are equal is a little tricky, one way is like this...
if ( this == that)
One equal sign "sets" a variable to a value, 2 equal signs "compares" two variables/values. The catch is that 'number as a string' problem at the beginning of the post. Let's make 2 numbers and compare them...
var A = 1
var B = 1
if ( A == B ) {
console.log ("true!")
}
>true!
Now, let's make one of those a string instead of a number...
var A = "1"
var B = 1
if ( A == B ) {
console.log ("true!")
}
>true!
Well, that's still true even though one variable is a string and the other is a number. We might not want that, we might want to only compare numbers to numbers or strings to strings. That takes three equal signs, and while the code in the "if" will run if that's true, let's add the "else" to run code if it's false...
var A = "1"
var B = 1
if ( A = = = B ) {
console.log ("true!")
} else {
console.log("false!")
}
>false!
I spaced out the equals signs to show there are 3 of them, called "strict equality".
"If" is the most common way to make a decision, but sometimes we need to "loop" or go through a series of values and check each one. Let's say we want to look in the player's backpack and see if they have a knife. The most common loop is "for"...
for ( counter ; comparison ; operation ) {
do something
}
So, first we create a counter, which is a variable almost always called "i", and we set a starting value...
for ( i = 0 ; comparison ; operation ) {
do something
}
Next we compare where we are (with our counter) to where we want to be (or the end of the loop, which in this case is the length of the player's backpack)...
for ( i = 0 ; i < backpack.length ; operation ) {
do something
}
Why not go until i <= backpack.length? Because the loop is always going to run the first time, so we want to stop before the length or else we'd run one time too many.
Lastly, we need to increase our counter (otherwise we won't go forward) which is usually with the "increment" operator, which takes a variable and adds 1 to it...
for ( i = 0 ; i < backpack.length ; i++ ) {
do something
}
And then we'd add the code to see if the backpack item we were looking at was the one we wanted. Which I'll leave as an exercise for the reader :).
Manipulating The DOM
Okay, I need to wrap this up because I've been typing for a few hours now!
So far we've just looked at JavaScript itself, how do we get our JavaScript to interact with the webpage? Well, we use the DOM, or Document Object Model. Basically, JavaScript itself gives us a few functions to access parts of the page.
There are 3 main functions we can use to select something on the page. If we want to get a tag (like <p> or <div>) we'd use...
document.getElementsByTagName("p")
document.getElementsByTagName("div")
If we want to get an element by it's class (let's say the class is "yellowtext"), we'd use...
document.getElementsByClassName("yellowtext")
And to get an element by it's ID..
document.getElementById("id")
We can also change the content of an element with...
element.innerHTML = new html content
I'm actually not going to go into this in any detail, while you can access elements from JavaScript I really prefer to use a JavaScript library called jQuery which is a lot easier to use (and type) - I'll go into jQuery when I start using it on the project.
Events
Last thing to mention, and again it's time to wrap this up - we can also listen for "events" something that the user does. So we can listen for a "click" event and do something when the user clicks on a button, or a "mouseover" event for when the user moves the mouse over an element. Again this is something that can be done in JavaScript, but I'm going to use jQuery for - and I'll be able to give you some concrete examples once the project gets rolling.
Wow, that was a lot - and even though I always say I've only scratched the surface, in this case that's an understatement! There is so very much more of JavaScript to cover - which is why it's usually discussed in something the size of a book!
This finishes the last of my 'whirlwind' tours, next post we're going to actually make something using HTML, CSS and JavaScript. As I've mentioned before, my recommended starting point to learn more is the w3schools site.
Until tomorrow!
Sunday, September 10, 2017
The Open2 Engine - part 2 - Programming Tools
I'm back, and still rounding up tools for my new project, The Open2 Engine. Last post I was gathering role-playing resources by looking at games that were released under the Open Game License (OGL). Today, I'm going to go over some tools for the programming side.
The Open2 Engine is going to be a webpage, like Twine, that can show and hide text, as well as run Interactive Narrative games. So I need a tool that will help me with writing all that HTML, CSS and JavaScript. Now, it is actually possible to just use the pain old Notepad that comes with Windows...
But while that may be possible, it's also kind of crazy :) One nice feature (to me) of most programming tools is "syntax highlighting," where the program colors your code to help make the different components stand out, like Notepad2 does...
Still, I am going to be working with multiple files, so I really need something that can keep them all conveniently open (instead of a million icons on my taskbar). Notepad++ has a really nice tabbed interface...
But to get really complicated you need an IDE (Integrated Development Environment) which has a lot of bells and whistles. The first one I read about (in the ton of programming books I've gone through the last month) was called Aptana Studio. Now, I had a hell of a time actually getting it to install, but finally did...
While Aptana does have a lot of features, during the install troubles I also installed Eclipse, which is very similar in style (though, they all share a lot of features and even appearance)...
Another editor I read about was Atom...
And Microsoft even made their own editor (that sure looks a lot like Atom above) called Visual studio Code...
But the one I'm going to use is called NetBeans. My screenshot below is not the default look of NetBeans, I have added the Darcula LAF theme and I'm using the Hacker font...
So why NetBeans? Well, from what I've read programmers can get into holy wars over their choice of editor - but I'm a total n00b to this, so I have no idea what is good or not. Each programming book I read mentioned a different editor, but NetBeans was the easiest one for me to actually get working and setup the way I wanted. And, it has all kinds of great features. If you look at the screenshot above, of a webpage, at the bottom-left there is a tree of all the HTML elements along with the classes and Ids for each - which is a very handy reference. Below is a screenshot of a JavaScript file, and again the bottom-left has a tree with an object I created and all it's properties...
Now, all the IDEs I've listed here will do the same basic things, providing helpful tree-views, syntax highlighting, autocomplete, and a host of stuff to make programming much easier. But there is another way to make life easier, and that's by using a "javacsript library."
A library is just a list of code that is in some way "better" to work with than regular JavaScript. Now, this is a little tricky. JavaScript recently (like 1-2 years ago) went from ECMA 5 to ECMA 6 while at the same time HTML went from 4 to 5. So there have been a lot of changes in the tools I'm going to be using - and some of the hard-to-use code that many libraries were designed to fix ended up getting fixed in all the changes. Still, I've seen a few libraries that look like they might be very useful - and in fact I believe that Twine uses them as well.
jQuery is the first. What jQuery does is really simple, it makes it easier to write code to work with the DOM (Document Object Model) - the framework that a webpage is built from. jQuery doesn't do anything new, it just does it more efficiently. Case in point, let's say I need to work on a part of my page with the ID of "myID" - my straight JavaScript code would look like...
document.getElementById("myID")
but in jQuery it would be...
$('#myID')
which is a lot shorter to type. Since I'm going to be constantly getting parts of the page, in order to show and hide things like Twine does, I'm going to be typing a lot of the above code, so anything that makes it easier on me is a good thing. There is a ton of stuff jQuery can do in all, I'm just scratching the surface here but I'll be demonstrating more if it's features when I start writing code.
There's also a cool expansion for jQuery called jQuery UI which helps you make some neat User Interface (UI) elements for a webpage...
Using this library will give me some tools to make the page look really cool, and act more like an application than a bunch of text (which is part of my eventual development plan for the project - I think I'm going to spend the rest of my life working on this, because I have a whole heck of a lot of things I want it to be able to do :).
The last library I've been looking at is Underscore. This library mostly exists to make some functions, some programming commands, easier to use. I'm not sure about this one. From my reading it looks like a lot of what Underscore does is a part of the new version of JavaScript, but I think it still has some useful shortcuts. We'll see how much mileage I get out of this.
There are a million JavaScript libraries, but these three seem to be ones I'll find useful - though I could be wrong about that. The great part about being totally new is that I'm not hung up on anything. If these help great, if not I'll figure out something else.
One last thing I'm going to mention are some of the books that I've been finding really helpful for learning HTML/ CSS/ JavaScript. I'm going to link to the editions Ive been reading (there may be newer, but these were the ones I could find via public libraries and used book stores)...
Head First HTML 5 Programming - Eric Freeman, Elisabeth Robson (O'reilly)
Head First JavaScript Programming - Eric Freeman, Elisabeth Robson (O'reilly)
HTML 5, JavaScript, and jQuery Trainer - Dane Cameron (Wrox)
Secrets of the JavaScript Ninja - John Resig, Bear Bibeault, Josip Maras (Manning)
jQuery in Action - Bear Bibeault, Yehuda Katz, Aurelio De Rosa (Manning)
Foundation Game Design with HTML5 and JavaScript - Rex van der Spuy (friendsofED/ Apress)
I'm not getting anything if you order any of these, I just wanted to mention them as a part of sharing all the resources I've been able to find.
So now that I've got a lot of tools, it's time to start putting things together. Since this whole project is going to be built with HTML, CSS and JavaScript, over the next 3 posts I'm going to go on a whirlwind tour of all three - starting tomorrow with HTML.
The Open2 Engine is going to be a webpage, like Twine, that can show and hide text, as well as run Interactive Narrative games. So I need a tool that will help me with writing all that HTML, CSS and JavaScript. Now, it is actually possible to just use the pain old Notepad that comes with Windows...
But while that may be possible, it's also kind of crazy :) One nice feature (to me) of most programming tools is "syntax highlighting," where the program colors your code to help make the different components stand out, like Notepad2 does...
Still, I am going to be working with multiple files, so I really need something that can keep them all conveniently open (instead of a million icons on my taskbar). Notepad++ has a really nice tabbed interface...
But to get really complicated you need an IDE (Integrated Development Environment) which has a lot of bells and whistles. The first one I read about (in the ton of programming books I've gone through the last month) was called Aptana Studio. Now, I had a hell of a time actually getting it to install, but finally did...
While Aptana does have a lot of features, during the install troubles I also installed Eclipse, which is very similar in style (though, they all share a lot of features and even appearance)...
Another editor I read about was Atom...
And Microsoft even made their own editor (that sure looks a lot like Atom above) called Visual studio Code...
But the one I'm going to use is called NetBeans. My screenshot below is not the default look of NetBeans, I have added the Darcula LAF theme and I'm using the Hacker font...
So why NetBeans? Well, from what I've read programmers can get into holy wars over their choice of editor - but I'm a total n00b to this, so I have no idea what is good or not. Each programming book I read mentioned a different editor, but NetBeans was the easiest one for me to actually get working and setup the way I wanted. And, it has all kinds of great features. If you look at the screenshot above, of a webpage, at the bottom-left there is a tree of all the HTML elements along with the classes and Ids for each - which is a very handy reference. Below is a screenshot of a JavaScript file, and again the bottom-left has a tree with an object I created and all it's properties...
Now, all the IDEs I've listed here will do the same basic things, providing helpful tree-views, syntax highlighting, autocomplete, and a host of stuff to make programming much easier. But there is another way to make life easier, and that's by using a "javacsript library."
A library is just a list of code that is in some way "better" to work with than regular JavaScript. Now, this is a little tricky. JavaScript recently (like 1-2 years ago) went from ECMA 5 to ECMA 6 while at the same time HTML went from 4 to 5. So there have been a lot of changes in the tools I'm going to be using - and some of the hard-to-use code that many libraries were designed to fix ended up getting fixed in all the changes. Still, I've seen a few libraries that look like they might be very useful - and in fact I believe that Twine uses them as well.
jQuery is the first. What jQuery does is really simple, it makes it easier to write code to work with the DOM (Document Object Model) - the framework that a webpage is built from. jQuery doesn't do anything new, it just does it more efficiently. Case in point, let's say I need to work on a part of my page with the ID of "myID" - my straight JavaScript code would look like...
document.getElementById("myID")
but in jQuery it would be...
$('#myID')
which is a lot shorter to type. Since I'm going to be constantly getting parts of the page, in order to show and hide things like Twine does, I'm going to be typing a lot of the above code, so anything that makes it easier on me is a good thing. There is a ton of stuff jQuery can do in all, I'm just scratching the surface here but I'll be demonstrating more if it's features when I start writing code.
There's also a cool expansion for jQuery called jQuery UI which helps you make some neat User Interface (UI) elements for a webpage...
Using this library will give me some tools to make the page look really cool, and act more like an application than a bunch of text (which is part of my eventual development plan for the project - I think I'm going to spend the rest of my life working on this, because I have a whole heck of a lot of things I want it to be able to do :).
The last library I've been looking at is Underscore. This library mostly exists to make some functions, some programming commands, easier to use. I'm not sure about this one. From my reading it looks like a lot of what Underscore does is a part of the new version of JavaScript, but I think it still has some useful shortcuts. We'll see how much mileage I get out of this.
There are a million JavaScript libraries, but these three seem to be ones I'll find useful - though I could be wrong about that. The great part about being totally new is that I'm not hung up on anything. If these help great, if not I'll figure out something else.
One last thing I'm going to mention are some of the books that I've been finding really helpful for learning HTML/ CSS/ JavaScript. I'm going to link to the editions Ive been reading (there may be newer, but these were the ones I could find via public libraries and used book stores)...
Head First HTML 5 Programming - Eric Freeman, Elisabeth Robson (O'reilly)
Head First JavaScript Programming - Eric Freeman, Elisabeth Robson (O'reilly)
HTML 5, JavaScript, and jQuery Trainer - Dane Cameron (Wrox)
Secrets of the JavaScript Ninja - John Resig, Bear Bibeault, Josip Maras (Manning)
jQuery in Action - Bear Bibeault, Yehuda Katz, Aurelio De Rosa (Manning)
Foundation Game Design with HTML5 and JavaScript - Rex van der Spuy (friendsofED/ Apress)
I'm not getting anything if you order any of these, I just wanted to mention them as a part of sharing all the resources I've been able to find.
So now that I've got a lot of tools, it's time to start putting things together. Since this whole project is going to be built with HTML, CSS and JavaScript, over the next 3 posts I'm going to go on a whirlwind tour of all three - starting tomorrow with HTML.
Subscribe to:
Posts (Atom)


