Showing posts with label Tutorials. Show all posts

Monday, October 1, 2018

Drawing and Animation Resources on YouTube

    So I meant to work on the next part of my series looking at the mechanics of the "Adventures in Middle-Earth" RPG, but I had a stray thought about drawing.  See, I suck at drawing, but for creating RPG material and Interactive Narratives it is very hard to do text only.  So I've always wondered if maybe there was some way of drawing "advanced stick figures" - simple, quick, basic drawings that would at least serve as workable placeholders for my projects.  And being me instead of getting the work done that I needed to get done, I decided to go chasing off after this random thought.  But, as is also often the case, I found some really good material.  So this is going to be another tutorial/ review update with videos about drawing and animation, should have ever wondered the same thing I did.  None of these are my works, I'm just linking to some great YouTube content creators, and a big thank you to all of them!


Gigantic
How To Draw A Face, 10 Flat Design Characters in 10 Minutes, Speed Drawing in Adobe Illustrator


    This is the first video I found that blew my mind.  It is amazing to see the range of characters you can make from just circles and squares.  This is a style that I think I can follow to make some characters of my own, and while the poster uses Adobe Illustrator (which is a professional, read: expensive, program) I think you could do this in LibreOffice Draw, the GIMP or Inkscape (all of which I have, because they're free).
    His channel has a lot of similar vids, including famous characters and animals, plus some random stuff.  Really great.
   
   
ZipUp
Vector Easy Flat Character, Illustrator Tutorial, ZipUp


    Similar style to the video above, but this one goes slower and is better as a tutorial rather than for inspiration.  The channel does not seem to be very active, only a few videos and the latest is a year old.  That's a bummer, the video is great.


Gamefromscratch
Free Game Art -- Full Game Kits


    One of the reasons I started looking into the drawing topic is because I'd like to design some games down the road, and while I want to make my own art, I have to admit that being able to use professional resources would likely be the better way to go.  This video has links to a bunch of sites, only about half of which I knew of before watching it.
    The site is great, frequently updated and talks about how to use a variety of engines and languages for creating games.  Really like this guy.


GDquest
[LIVE] How to make modular 2d game sprites


    Speaking of art and game design, this is a really cool livestream of making modular art assets.  It is pretty long, so I hope he'll do a more concise follow-up in the future.
    A great channel with lots of videos for Blender and GoDot, and a bunch of game design stuff.
   
   
Grant Abbitt
Rigging People | Blender | Quick | Beginner


    From static 2d art to animated 3d, this is a very cool video about using Blender for 3d animation.  Much more technical than I started with, but something to bookmark for the future.
    Fantastic channel with a ton of videos about Blender.
   
   
AlanBeckerTutorials
12 Principles of Animation (Official Full Series)


    Awesome video, one to watch every time before you start an animation project, packed with great guidelines for making the best animated scenes you can.
    Lots of other good animation videos, I like this guy.
   
   
freeCodeCamp.org
Pacman & Ghost Animation: CSS Tutorial (Day 17 of CSS3 in 30 Days)


    This video was mind-blowing, I have been studying CSS for about a year (so I'm no expert) but I would never have thought to create Pac-Man and a ghost using CSS Borders instead of line art.  And I did not realize how power CSS's animation effects could be.  One of my favorite videos for realizing you can use tools in all kinds of creative ways.
    This site just totally rocks!  A ton, lifetime even, of videos for web and programming in all sorts of languages.  A fantastic resource for any fellow noob programmers (like me) out there.


There you go, 7 videos and channels that I think are amazing - I hope that you can learn some cool things too!


You can find more tutorials and reviews I've linked to here

Thursday, January 4, 2018

Character Viewer: How To Save User Input - part 2 - From Form to Table

    And I'm back to the Character Viewer tutorial, sorry about the delay (unless you're reading this years later, in which case no time has passed thanks to the magic of the internet).  We started by writing data we had hand-coded to a table, nice but useless.  Last post we added a form to collect the character data from the user, also nice but useless.  Now we're going to make this actually useful and take the data from the form and add it to our table.  Well, as useful as it is to have a very limited character summery - hmm... we'll have to add some more to this project.  Later.  We've got enough work for today :)


Measure Twice and Cut Once
    That's old carpenter's advise, but it applies to most everything.  A good plan will keep things from going off the rails, and looking ahead lets you avoid problems instead of fixing them.  So let's look at what we need to do before we start coding.  I'm going to need a new function that takes the data from the form, formats it, and then calls the existing function to write it to the table.  So I'm going to add that function and fill it with some comments about the things I need it to do...


Now, I might have missed some steps, we'll see as we go along, but this is enough of an outline to get me pointed in the right direction.
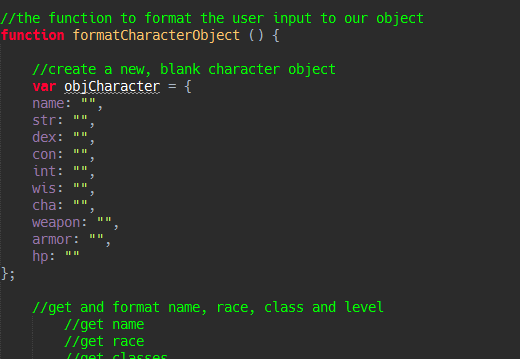
    So let's set the foundation.  First, I'm going to use the same function from the first post to iterate over the character object's properties and populate the table - so I need a blank object with the same properties...


I'm going to pass that object to the function to write it, so let me add that too...


And at the moment I can't actually run the function because it isn't tied to anything.  So let me add an onClick to the button I put on the form.  I can do this in two ways.  I can create an event listener in JavaScript or I can add it to the element in HTML.  Under the Model-View-Controller paradigm I should keep it in JavaScript, where the "controller" stuff happens that makes the program run.  But I actually like adding it to the HTML of the button itself, so when I look at the button I know what it's supposed to do.  Neither is really wrong as far as the browser's concerned, it's a matter of style.  Since the button is the only event handler I need, I'm going HTML.  If I was using something like jQuery UI where I had to initialize a ton of elements I'd do it in JavaScript to keep things together.  Anyways, here's the HTML attribute to fire the function when the button is clicked...


Okay, that sets up the framework, one blank object ready to be filled, a call to the function to display it, and a handler for the button to launch it.  Now we just need to start getting some data.


Do You Want To Do This The Easy Way Or The Hard Way?
    Let's start with the easy way.  Some of our form data is going to need to be processed, so let's grab something that we can directly display - the HP total.  The user is going to put in a number and we're going to directly copy that to the table, so it's a easy place to start.  Or is it?
    In order to get the data from the form we have to tell JavaScript where that data is.  Which turns out to be more complicated that one might expect.  There are actually a couple of ways to do this simple little thing.  Let's go from most complicated to least (the latter being the one we want to actually use).
    Like all things computer-related JavaScript has grown and developed over several versions.  The last big version, or ECMAScript was ES5.  In that version there are two main ways to select an HTML element, by Id or Class.  There are two different functions for each.  In this way to select an element we'd type:

document.getElementById("id")
or
document.getElementByClassName("class")

    ES6, the latest version of JavaScript consolidated those into just one function:

document.querySelector("#id") or document.querySelector(".class")

     The ES6 method isn't bad, but it also isn't great.  It's kind of long, 26 characters without the selector.  And we have about 14 form elements we need to look at.  The easiest way is to create an alias, to define a function that's shorter to type and make it the same as the longer function.  That's what something like jQuery does.  In a simplified version (very, very simplified) jQuery does this:

function $ (selector) {
    document.querySelector (selector);
};


which means you can type $("#id") instead of document.querySelector("#id"), which is 25 characters less typing.  25 characters may not seem like a lot, but when you make a few hundred selections that comes out to a short story's worth of saved code.  And we could do the same thing jQuery does.  But we won't.  Honestly, if I'm going to do something jQuery-like then I might as well just use jQuery instead of reinventing the wheel (and a poor version at that).  So for this tutorial I'm going to stick with the ES6 syntax and just copy-and-paste the code I need.  14 elements isn't a big deal, and if I decide to bulk up this app and add a bunch of features I'll just use jQuery and we'll have a tutorial about that :)  So, now that we know how to select something let's do it.
    Because our target is a textbox we need to select it, and then get it's "value" property.  Then we're going to save that to a variable and write it to our object.  Here's the code...


    And here's what it looks like when we run it...

 Woo Hoo!!!  We just took user-input and wrote it to our form, high-fives!  Okay, I'm way too happy about something so trivial :)  Now that we got the easy part done, it's time to get more complicated.


Formatting The Attributes
    This part is going to be ugly.  The next hardest, in a very general sense, are the attributes.  The attribute scores themselves are easy, we're going to take them from the form and input them directly to the table.  It's the modifiers that are tricky.  We decided (well, I decided and you got dragged along for the ride) to have the user only input the score and let JavaScript calculate the modifier.  This is good because it prevents the player from messing up the modifier, people are human and and make mistakes, so things like this - just looking up data on a table - are good candidates for leaving to the computer.  It was also a kind of dumb decision because it means adding more work for us with questionable reward.  But this is a tutorial, so it gives us something to learn (and if I do develop this further it's likely something I'll change).
    Our task then is three-fold, we need get the value and then use that to get the modifier, both of which get saved to the character object.  Getting the value we've got, like with HP, we're going to look up the value and save it to a variable.  To calculate the modifier we're going to write a new function that will apply the correct formula and return the modifier.  Let's write that function now.  So what is the formula for an attribute modifier in Pathfinder?  It's the ability score minus 10, divided by 2 and rounded down.  We save that and return that variable, which makes our helper function look like this...


 Cool, we can calculate the modifier.  Now comes the really tricky part.  Our function to write the character object is really easy, it just iterates through the object and writes each property.  Which means we have 6 properties for the attributes all of which are going to do the exact same thing, take a score, calculate the modifier, then make a string with both.  So let's expand out helper function to do all of that, it'll cut down on the duplicate code.  Or final function is going to look like this...


We have to call it 6 times, once for each attribute, because the way the form is set up we can't easily iterate through it.  Okay, let me correct that.  I know some ways to iterate through it, and how I could change it, but I don't know the best way.  I'll look at changing this section after I've done some more research.  For now, while this is not the ideal method, it isn't that terrible, so we'll go this way...


Which now looks like this when we create a character...


Woo Hoo again!  That's a good chunk of our character done.  Three more table cells to go.


Name, Social Security Number and Date of Birth, Please
    Okay, let's get the name section done.  There are 4 things we need: the name textbox, the race drop-down box, the classes (which are checkboxes and there can be more than one checked), and the character's level number box.  Three of those things are easy :)
    Let's grab the easy variables, with this code...


    Which leaves the trickier part of checking the checkboxes.  And I discovered something, when I wrote the HTML code for the checkboxes I didn't give them any Id's to be able to target them later.  Ooops... so here's the fix to that...


And then I just need to query each checkbox and see if it's checked.  If it is I'll add it to the string I'm going to display, which makes the function this...


With the final app looking like this...


En garde
    That leaves just two more cells, the ones for the weapons and armor.  Let's handle the weapons first.  So we have three weapons, and they are on radio buttons so the player can only choose one.  We need to get which one the player selects first.  The weapon will give us the name and damage.  Then we need to check the Base Attack Bonus field and add the appropriate attribute modifier to get the final part, the to-hit bonus.  Those three strings get concatenated, or added together, to give us the table cell.
    Or at least, that's how it should work.
    There's just one little problem, our character object isn't formatted that way.  When I first wrote this app I was looking for something simple, an easy way to write the data to the page.  So each attribute is just a string, with both the score and the modifier together.  And now that's a problem since I want to deal with those values separately.  I could just take the score and calculate the modifier again, but the function I used to do that is the one that also returns the complete string.  I did not structure these functions properly to fill in these last cells.
    Now, I try with these tutorials to show things that work.  I've written a few versions of the code so far and they didn't turn out right, so I omitted them.  I want these to be learning experiences, not full of things you shouldn't do.  I'm leaving this mistake in though because it does go back to the beginning of this post, that part where I was outlining what I needed to do.  During that step I really should have looked closer at how to structure my data, what different pieces I was going to use.  I didn't and now I'm in a bit of a fix.  It's important to have a good plan, to be able to see what you're doing in your head.  Even still you'll make mistakes, that's just how it works, but a good plan means fewer mistakes.
    So how do I fix this?
    I'll give you a minute, if this was your program what would you do?..........
    .....
    'K, time's up.  I can see two options.  The good one is to re-write the character object, so that I could use the modifiers in other ways down the road.  That, however, would mean re-writing the function to put that data on the page.  That's a lot of re-writing.  So option two is easier, and what I'm going to do.  I'm going to take the function I called to make the attributes and split it.  I'll leave the part that makes the final string, I'm just moving the part that calculates the modifier into it's own function.  That makes the least changes to the attributes code.  Then, for the weapons and armor I can just call the function to make the modifier and use that.  It'll basically double those calculations - but it's not like that'll matter in such a small program.  It's not an elegant solution, but it's the least re-coding.  Honestly this whole thing was a mistake from the beginning.  My function to write the object directly to the table is simple, but it's also way, way too simple for something as complicated as a Pathfinder character.  If this was a real app, meant to be useful and not a learning tool, I should have used a totally different design.  But I didn't, so we'll go with what we've got and get this done.
     That means that this is the revised code for the attributes function and the new modifier function:


     Moving on from that glitch, now we need to get the selected weapon.  And again there's another problem, just like with the checkboxes I didn't give each button an Id to reference it by.  Ohmygosh, and the armor radio buttons are the same way of course.  So let me fix all that...


Just like with the checkboxes we're basically going to do a bunch of if/then statements on each button.  There is a better way to iterate through the form, again though this is a small and limited app so I'm not going to worry about that right now.  This gets kind of complicated, so let me break it down step by step.
    First, I'm going to use the parseInt() function and get the Base Attack Bonus.  Even though this is listed as a number field in HTML I want to make sure JavaScript treats it as a number.
    I'm then going to check with some if/then blocks what radio button is checked.
    Another parseInt() on the function to find the correct attribute modifier gives us the other half of the to-hit modifier, and the damage modifier (except for the bow, which doesn't add any attribute for damage, only to-hit).
    Then we check if the To-hit modifier is 0 or higher, if it is I'm adding a "+" in front of the number; if it's negative there is no "+" of course.
    Lastly the same 0 or higher check for the damage modifier, for formatting purposes, and then the string is assigned to the character object.
    It's a lot of code for something so simple, here's the unarmed code block (for brevity's sake):


I missed the screenshot of the table, oh well, we're almost done so you can see the final version soon :)


Hide Behind The Pile Of Dead Bards!
     Ohmygoodness... we're almost done.  Yeah, this is a way too complicated "tutorial" for a fairly simple concept.  I know I haven't been the greatest teacher so far, and I'm sorry about that.  I'm learning myself.  But this is it, one last section and we'll be done.
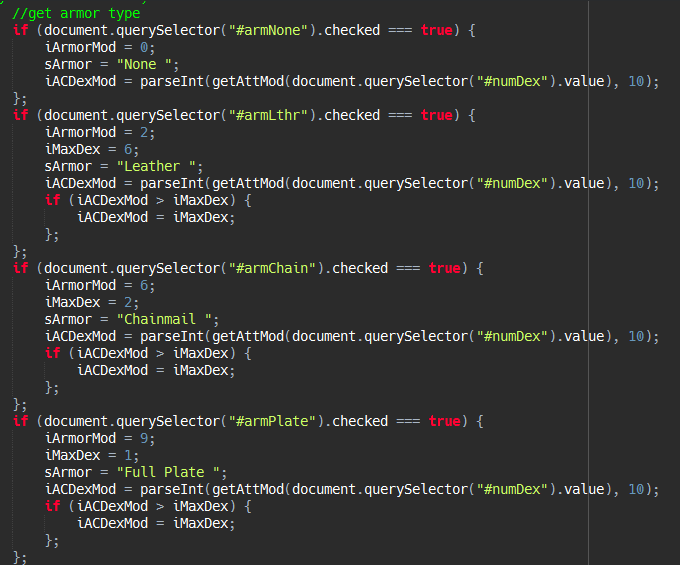
    So armor is a lot like weapons.  First we need to figure out which one is selected.  Then, instead of getting a BAB score, each type of armor is going to have its own armor class modifier.  Then we just add different modifiers to the base armor class to get the "touch" and "flat-footed" armor classes.  So, like weapons this is going to take a fair amount of code to work out.
    Let's examine the individual components before we start madly coding.  There are three things that make a character's AC.  First there is the base AC that everybody gets, a 10.  This is the universal "naked man" AC.  Then there is the armor's modifier.  This is easy, each type has it's own mod (with "none" or no armor being a 0) - but, the catch is that you add your armor mod to your "full" or default AC and to your flat-footed AC, but not to your touch AC.  Last is the character's Dex modifier, again easy, but while you add it to the full AC and touch AC, it is capped depending on the type of armor, and it isn't added to the flat-footed AC.
    So first I'm going to determine what type of armor the character is wearing.  That will let me get the Armor AC modifier, the name of the armor for the final string, and then I can get the Dex mod and do an if/then block to make sure it isn't above the max dex for that type of armor.  Here's the code:


Then I can finish by adding the right things together, forming them into the string and writing the final string to the character object.  Here's that code:


And here are what a few finished characters look like:


   Great goodness, that took a very long time.  Well, for me at least - you're lucky you can just read the end results.  So at last we have looked at how to get data from a form and write it to an HTML table.  Is this app very useful?  Well, I guess it might be in a limited way.  If you changed everything to textboxes you could easily let people write their own stuff, and that would cut out a lot of the programming headaches, and it might actually be a somewhat useful app.  I will leave that to the reader if you want to try it :)  Here is the link to my Google Drive with the code.
    This little project spiraled out of control into something of a trainwreck, but hopefully it was a learning experience - it was for me :)  Who knows, maybe it would be worth it to play with this some more and turn it into some kind of character creation utility... hmmm.... we'll see.  For now I am going to sign off and go get that breakfast I'm 8 hours overdue for.  Until next time!


Thursday, November 9, 2017

Character Viewer: How To Save User Input - part 1 - Fun With Forms

    In our last tutorial we looked at how to write JavaScript data to an HTML table. This lets us populate a table dynamically instead of having to hand-code it. Except it doesn't really, after all we had to hand-code the objects we used to populate the table. So we need a truly dynamic way to fill our table, by letting the user create the data. So for this tutorial we're going to add to our app the ability to read and save user input. Let's take another quick look at what we've got...

    So this is still what we want it to look like at the end, a table with information about our Pathfinder characters. We're just going to add a few things.

Collecting User Input- Form Controls
    HTML has several elements that are designed to gather input, they're called form controls. A <form> tag defines a group of controls that are all going to be collected together. So we'll to start our section with that. We don't have to, but it's convenient. I'm going to add a border to the form and a margin to make it stand out, plus an <h3> header and some padding since the header looked a little funny. Here's what it looks like and my code...


    Okay, so now that I've set aside the space for my form I need to put in the controls to actually collect all the data. There are a lot of form controls and I'm going to try to use a variety of them for this project so you can get to know them all (kinda like Pokemon :). The most basic control is the textbox, a box that the user can type text into. It's built from a core element <input> and given the attribute type="text" and should work great for our character's name...


     The default textbox is about 15 characters long, we could change that with CSS, but I'm leaving it for now since it works for me. If you've ever looked at the code for a form (or if you do later) you'll notice that most form controls have a name="something" attribute. The name attribute is used when sending the form's data (called "submitting" the form). I'm not going to be sending this form anywhere, I'm going to collect the data with JavaScript, so I'm using the typical id="" attribute to track everything instead.
    So we have a field that the user can type in general text, numbers or letters. Let's look at another form control. For the character's race let's say we want them to choose from a limited list. This is a tutorial and not a working program so we'll try some different things out, even if they might not be ideal for the finished (or "production") app. Let's put in a drop-down list, this will let the user select an option from a list that we provide. This has the advantage that you can prevent the user from entering invalid data (since they're limited to the list) or from mis-typing/spelling the data. The downside is that you're limiting the user to the options you provide, so you need something that is complete and unchanging, like a list of the USA's state abbrevations. So this is not the ideal control for a character's race, since there are way too many Pathfinder races to list here, but like I said we're just doing it to play with the control.
    What we need is a <select> tag that's going to wrap a bunch of <option> tags. Each option is going to have a value="" attribute that's going to be the data we save (for JavaScript to read), and the text inside the option is going to be what the user sees. Since these are going to be the same thing, we want the user to see exactly what we're going to save, it's going to look a little funny but it makes it easier for Javascript to read later.
    I'm going to add options for only a few races, and here's what my finished control looks like...


    Okay, we've got the first two things down, lets go ahead and use another new control. A character can have more than one class, so let's use a set of checkboxes. The <input type="checkbox"> creates an element with a name and a box the user can click on. This lets the user choose multiple options. So I'm going to make a checkbox for some of the basic classes, but I want to show that they all go together, so I'm going to wrap them in a <fieldset>. This element is just going to draw a border around all the checkboxes, to show they're related...


Note that in my HTML code I have each checkbox on a separate line, but I didn't put in any <br> tags so they are displaying in the page as being on a single line. That's for my sake, it's easier for me to read my own code if I put each element on a separate line - and I mention it as a reminder that how your code looks and how it displays are two different things. Use whatever look is easiest for you. Speaking of looks, I'm not a fan of how crowded this table is getting. Each element seems to be smashed against the others. I want to add some spacing. I'm going to do that by adding a some CSS to the <form> element, a line-height: 200% will space things out a bit. I'm also making the fieldset a little shorter...


That's a bit better. Good enough for now at least.
    Let's keep adding stuff to our form. Next is the character's level. So far I used the textbox, which allows the user to type in anything, numbers or letters. But a character's level is only a number, so let's use a new control that will prevent the user from accidently putting any letters in there. This is a new -input type="number"- that was added in HTML 5, so older browsers might not be able to show it, but my up-to-date Chrome will do fine. It doesn't look like much at first...


But put the mouse over it and you'll see the little up and down arrows to change the number...


    So let's put a starting value in there. I'm going to add the value="1" attribute, and levels don't go below 1, so let's also add a min="1" attribute to keep it in the right range. Also, the box is pretty long, so in CSS I'm going to set it's width to just a few characters. Here's the final look and code...


    Wow, so we finally finished the first cell of our table :)  We've done pretty good at going through all the different form elements.  So I'm going to use those same number fields for all of the attributes.  Now, I'm going to have the user input the value of the attribute, not the modifier.  The modifier is a formula, so I can have JavaScript calculate it.  This will help me avoid any mistakes or funny math from the user.  This is a general practice when you're making forms, called "validation."  You want to make sure that you're getting the right data from your form.  So you start by limiting the potential mistakes as much as you can, and then you validate your data to make sure it's what you expect.  Users make mistakes, not because people are bad and lie (though some few do) but because people are people and they make mistakes.  So you want to structure your forms in a way that minimizes those mistakes and keeps an eye out for them.
   Another thing is that my form is looking a little thin.  So far it's just one row of inputs on the left of the screen.  That means there's a lot of wasted whitespace.  I'm not going to worry about this being seen on a mobile device or other small screen - that could be a tutorial of it's own.  So I'm also going to make 3 columns, by using <div>s and setting them to float in CSS.  So with the attribute inputs and column layout here's what the form will look like and it's code...


To make columns you can set a <div> to position: relative and float: left but those need to be inside a container with position: absolute which I set the <form> to.  Take that out the absolute container and you get a mess...


    The absolute element is like a fixed reference for the relative ones to move around. And float: left was described to me like a balloon: that element will float to the top of it's container and then drift to the left. It makes the div's align at the top and sit side-by-side. So I've got 3 columns of content in the form. I had to remove the width attribute I had added to the fieldset, now that I've got the columns I don't need to artificially shorten the fieldset.
    We're almost there. For the next two cells of our table, the weapons and armor, let's go ahead and use one other type of form control: the radio button. A radio button is like a checkbox, but it is round instead of square and the user can only select one option out of the group. It's an <input type="radio"> but each one in the set needs the same name="" attribute so the browser knows they all go together. Again this would not be a great choice for a production app, but we're learning and playing. So here are a few weapons as radio button options...


    I set the "none" radio button to be checked by default, so that something would be selected. Pretty easy. I also centered the attributes since I thought they looked better that way. Let's finish the form and add the last few controls. I'm putting in a number field for the base attack bonus, I'll have JavaScript add the Str or Dex mod depending on the weapon. Then another set of radio buttons for armor. Lastly another number field for hit points. And that will give us everything that goes into our table...


    Not bad, just a final finishing touch and we'll be done with our form. First, we need some way to add the character, so I'm going to add another <input> element with the type="button" that will be used to launch a JavaScript function to read the form and add it to the table. Another thing to consider though is if the user wants to clear the whole form, say they change their mind about what they put in? Well, in that case let's add a button to reset the form, of course it's <input type="reset">...


    And that makes our form. Go team us! ;) You can download the code from my Google Drive here and play with it yourself. Now that we've created a form all we need to do is make it work. That's going to take some JavaScript to read our form, format it, and then add it to the table - all of which we'll get into next week. Until then!


Thursday, November 2, 2017

Simple Character Viewer Tutorial: writing HTML tables with JavaScript

NOTE: I've been having trouble getting my programming posts together, which should hopefully be fixed now.  I apologize for the lack of code updates over the last few weeks, and things will be more consistent from now on.

    I've found a lot of great sources of information about programming since I started teaching myself a few months ago.  My first idea for the "Thursday Tutorials" section of this blog was to put links to some of that information so it can help others.  But I did have another dream, which I want to realize today: writing my own tutorials.  Now I need to stress again that I am not an expert coder, as mentioned I only started learning this stuff a few months ago - but I have discovered over the years that the best way for me to learn something is to try and teach it to others.  So this is going to be the first post in a series aimed at learning how to do something in HTML/ CSS/ JavaScript.  I have been discussing my code in the Friday Frustrations series (currently working on my project called "Bookworm"), but that series is meant to produce a working application.  This series is meant to look at one specific topic and discuss how to do it; what I'm going to make is not anything really useful (at least not to start, who knows what'll happen as we add features to it?).  Which begs the question: what are we going to make?
    One handy thing to be able to do is to write data to a table.  So here's a screenshot of an HTML table that has some basic character information:


    Instead of hand-coding that table, wouldn't it be nice if we could make a blank table and then write each row dynamically using JavaScript?  It sure would!  So how do we do that?  Well, Grasshopper, let me show you...

Creating The Base Table
    First of all we need the basic table layout, with the header and stuff.  I'm going to add some CSS to make things look pretty.  This is the final blank table...


And here's the HTML code...


And the CSS code...


    That gets us the basic table, now we just need to be able to populate it.
   

Creating the Character Object
    So we have 10 table cells that we need to display on each row.  I'm going to start by doing this the easy way.  The easiest way is to make each cell a string.  So for an attribute, like the "16 (+3)" in the example I'm just going to store that same string in my JavaScript object.  Now, I'm doing that because I want to show you how to write data to a table, and that's the simplest way to do it.  But, in reality that would not be a very useful object to actually write code for in something more interactive.  The main attribute value, "16," and the modifier, "(+3)," should be stored as separate bits of data so they could be read/ interacted with individually.  And we'll see about writing something that will be more useful to program and read down the road.  For now let's start easy.
    That dealt with, basically we just need an object that has 10 values, the string for each cell.  That's a pretty easy object to create...


I'm going to hand-code a few of these to start with, then we'll look at how to let the user create their own...


Writing the object to the table
    Objects in hand, and basic table set up, let's get to the main event and actually write those objects to the table.  I'm going to start by doing this in pure JavaScript (I'll add how to do this with jQuery in a bit).  What we're going to do is create a new table row, add each cell from the character object, and then append that to the table.
    Let's look at the ugly way to do this.
    What we need to do is comprised of several parts.  First, we need to create a "document fragment" - some HTML code that isn't attached to anything.  Our fragment starts with a <tr> to make a new row, then we make a new <td> cell and fill it with the right object property.  We need to add the object's string with a method called "innerHTML" - that's because we're adding <br> HTML tags to the strings for formatting, if we add them as plain text the browser will just display "<br>" instead of actually making a new line.  Let me show you what I mean...


    So, with that in mind, let's look at that ugly code.  Basically, the ugly way is the longest way possible - in this case that's hand-coding each cell.  Here's a screenshot of the code...


And what it looks like...


    As you can see this does work, it adds the data and formats it properly, but it's ugly because we have to write a lot of repetative code for each step.  Instead of writing out each object property by hand, why don't we see if we can use a loop to simplify the process?  Remember, a good programmer is a lazy programmer :)  That said, we can look at our ugly code and see exactly what steps we need to repeat:

//write the object to a document fragment
var tblRow = document.createElement('tr');
   
//create and append each property
var tblName = document.createElement('td');
tblName.innerHTML = CharacterObj.name;
tblRow.appendChild(tblName);
   
var tblStr = document.createElement('td');
tblStr.innerHTML = CharacterObj.str;
tblRow.appendChild(tblStr);
   
var tblDex = document.createElement('td');
tblDex.innerHTML = CharacterObj.dex;
tblRow.appendChild(tblDex);
   
//append the fragment to the table
var domTarget = document.getElementById('tblCharDisplay');
domTarget.appendChild (tblRow);

    The beginning we only need to do once, creating the <tr> for the new row our character will take up.  I'm only going to use one row for each character, though I don't have to.  The name cell has 3 lines, and so do the weapon and armor cells - so I could have each character split across 3 rows.  I just don't think that would be very useful, it would mean even more code to make the extra rows and several of those cells would be empty - I think using the <br> tags is a more convenient way to get the formatting I want.
    Also the ending, appending the fragment to the main table, is something we only need to do once.
    The repeating code that we need a loop to handle is in the middle, creating the individual <td> cells for each of the 10 object properties.  That code is make up of 3 parts, first we create the new <td> cell, which is empty.  Then we fill the cell using innerHTML with the object's property string.  Last we append the cell to the row.  Easy.  So let's look at the loop that's going to handle this for us...

//create and append each property
let prop;
for (prop in CharacterObj) {
    var tblCell = document.createElement('td');
    tblCell.innerHTML = CharacterObj[prop];
    tblRow.appendChild(tblCell);
};

    This is pretty simple.  We made a variable to hold the current property.  Then we use a for-loop to iterate over each property in the object, creating a cell, populating it and adding it to the row.  It looks like this...


    And there you go, we've written some data from a JavaScript object to an HTML table.  Good job us!  Yeah, yeah, I know it's not really that big of a deal, but you have to acknowledge every accomplishment, even the little ones.
    Since this isn't a very impressive app, there is a lot of room for improvement.  Which we'll do next week :)  If you want to play with the code for this yourself, here's a link to it on my Google Drive.